Understanding Incisal Translucency
Incisal translucency is the see-through quality at the biting edge of front teeth. It occurs because thin enamel has little dentin backing, so light passes and scatters. Picture a small chip on a front tooth that looks slightly gray at the edge. Understanding incisal translucency in bonding helps achieve lifelike results.
Near the incisal third, dentin thins out, and enamel prisms transmit and scatter light. The very edge can show a bright “halo” where light bends at the margin. Age and wear change this look, since young teeth may show faint mamelons, while older edges can appear flatter or more translucent. Clinical studies have measured incisal translucency in natural, unrestored anterior teeth, confirming it is a consistent, observable feature [1]. Population analyses also document individual variation, which supports custom shade and translucency selection for each patient [2].
To mimic nature, dentists layer composite with different opacities. A thin palatal shell sets form, a more opaque body shade rebuilds dentin support, and a final translucent enamel layer recreates depth. Too much translucency can make the edge look gray in certain light, so controlling value is key. For small chips, minimally invasive dental bonding can restore form while matching edge character.
- Enamel thickness and remaining dentin support
- Edge length and planned function
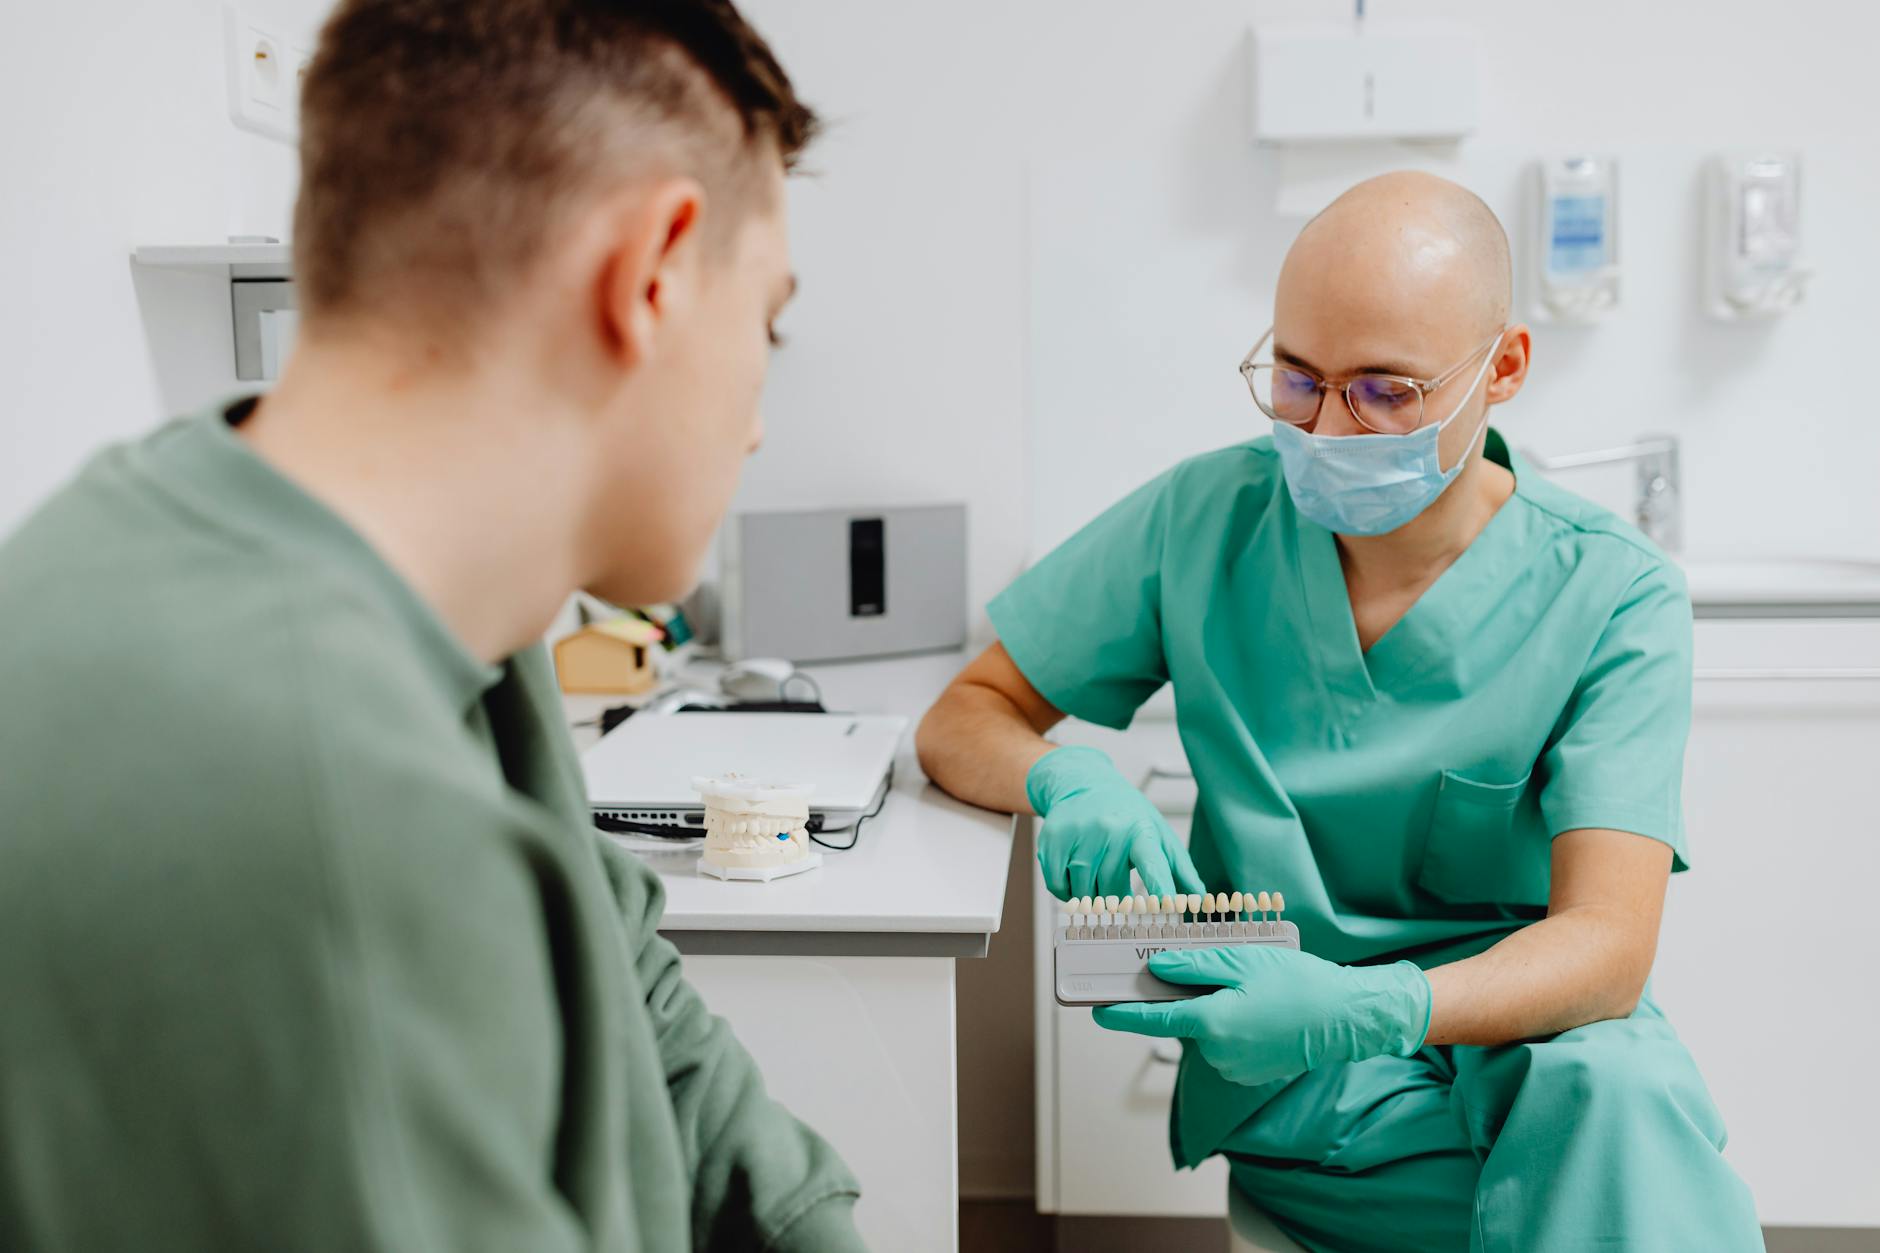
- Shade value, chroma, and translucency of nearby teeth
- Presence of halo, opalescence, or faint white specks
- Hydration and lighting during shade selection
Right after bonding, a tooth can look lighter because it is dry, then it settles as it rehydrates over the next day. Finishing and polishing influence gloss, which affects how light reflects and how translucent areas appear. Gentle habits help bonded edges last, such as avoiding tearing hard foods with the front teeth. When edges are heavily worn or cracked, custom porcelain veneers may offer better control of translucency and strength. Small details at the edge make a big difference.
Importance of Layering in Composite Bonding
Layering matters because natural teeth are not a single color or opacity. By placing composites in thin, different layers, we can control brightness, depth, and the clear look at the biting edge. This helps a repair blend with the surrounding tooth from every angle and in different light. A small chip can disappear when layers are balanced.
Think of a chipped front tooth after biting a fork. The inner layer, like dentin, sets the value, which is the overall lightness. A slightly more opaque body shade builds that base, while a translucent enamel layer adds depth and the glassy edge. Proper layering lets us mimic opalescence and a gentle “halo” at the very tip, which are key parts of incisal translucency in bonding. When these layers are too thin or too translucent, the edge can look gray; when too opaque, it can look flat. Balanced layering avoids both problems.
Thickness control is crucial. Very thin enamel-like layers, often around a fraction of a millimeter, allow light to pass and scatter, creating a lifelike edge. The body layer below should be thick enough to support brightness without washing out details. Clear matrices or a silicone guide help shape the palatal shell first, then the body, then a final enamel glaze. Planning also matters. If a patient wants a lighter smile, complete any professional teeth whitening before shade matching and layering, so the final repair still blends.
Finishing and polishing bring the layers to life by setting gloss, which changes how light reflects at the margin. Subtle texture and correct line angles keep the repair from catching the eye. For very large fractures, or when much enamel is missing, full coverage with carefully matched crowns and bridges may give better long-term strength and color stability. If you are planning a visit, you can check our current hours any time. Thoughtful layering makes small repairs look like natural enamel.
Techniques for Achieving Lifelike Results
Lifelike results come from planning, precise margin design, careful layering, and thoughtful finishing. We first map brightness and clear areas, then place materials in thin steps that match natural enamel and dentin. Controlled tints and a gentle edge “halo” help recreate depth. These steps make incisal translucency in bonding look natural in everyday light.
A runner chips a front tooth on a water bottle. To hide the transition, we place a long, shallow enamel bevel so the new material feathers in invisibly. Shade is selected before the tooth dries, then rechecked during the visit, since a dry tooth looks lighter. Good isolation keeps the field dry so the bond is strong, yet we limit dehydration time to protect color accuracy. When needed, a simple silicone index from a mock-up guides the palatal shape without guesswork.
Next, we map the tooth’s zones. Slightly more opaque composite sets overall brightness, while a thin translucent layer at the edge recreates depth. If a soft “halo” is present in the neighbor tooth, a tiny opaque ribbon is placed right at the tip, then capped with clear enamel. Subtle internal effects, like faint mamelons or tiny white specks, are added sparingly so they do not look artificial. We cure in small increments to control contour and reduce shrinkage, and we limit the thickness of the translucent cap to prevent a gray edge.
Shaping and polishing bring the restoration to life. We re-create line angles so light reflects like the natural tooth, then add gentle surface texture that softens reflections. A clear gel during the final cure hardens the surface and improves gloss. Polishing goes from fine shaping discs to pre-polish rubbers, then a brief high-shine paste. Finally, we check how the teeth meet in simple forward and side movements, adjusting light contacts to protect the new edge from chipping. Small, thoughtful steps make the result look like real enamel.
Selecting the Right Tints for Bonding
Selecting tints starts with matching value, which is the overall lightness, before fine color. We map where the tooth is warm, cool, or clear at the edge, then choose small accent tints to echo those zones. A quick try-in on a clear strip beside the tooth helps confirm the look in real light. Tints should guide the eye, not overpower it.
A teen chips a front edge before school photos. For incisal translucency in bonding, we first build the dentin body to set brightness, then use tiny amounts of tint for character. Blue-gray opalescent tints can suggest a cool, glassy edge, while a very fine opaque line right at the tip can hint at a soft halo. Near corners, a whisper of amber warms the transition so the repair blends in different lighting.
Placement and thickness decide success. Tints work best as a very thin film on top of the cured body layer, then sealed under a final enamel layer. This keeps color stable, smooth, and easy to polish. If a tint sits at the surface, it can look painted on or stain over time. Too much gray or blue can drop the value and make the edge look dull, so we add the smallest amount that creates depth. When a white spot or crack line needs softening, a faint neutral tint can reduce contrast without masking natural texture.
Testing matters. Shade and tint should be chosen with the tooth hydrated, then rechecked during the visit as lighting changes. A small cured sample on a clear strip lets us see how a tint shifts warmth or coolness before it touches the tooth. When a patient plans overall lightening, complete whitening first so the final tint map still matches. For very complex color patterns, ceramics may offer better long-term control, but most small chips blend beautifully with careful tinting.
Thoughtful, minimal tints make bonded edges look natural in everyday photos and daylight. Less is usually more.
Impact of Light on Translucency
Light changes how a restored edge looks. Under cool indoor lights, a clear edge may seem bluish, while sunlight can make it look warmer and brighter. Angle matters too, since backlighting can make the tip glow, and front lighting can make it look more solid. This is why incisal translucency in bonding must be checked in different lighting.
Picture a quick selfie in the car, then another under bathroom LEDs. Thin enamel at the edge lets light enter, scatter, and exit, so the background, the light color, and the viewing angle all shape what you see. Smooth, glossy surfaces reflect light like a mirror, while gentle microtexture scatters it, softening bright spots. A thin saliva film can also boost reflectivity, making clear areas seem brighter.
Because light shifts the look, shade and translucency are chosen with the tooth hydrated, then rechecked under operatory light and near a window. A neutral gray background helps your eyes judge brightness without distraction. Clinically, we limit very clear outer layers so the edge does not lose brightness in cool lighting. Darker shades and thicker layers can reduce how far curing light travels, which may lower polymerization at the bottom of the layer, so dentists adjust layer thickness and curing time to keep strength and color stable [3].
Surface changes also affect light. Minor scratches lower gloss, increase diffuse reflection, and can make a clear edge look dull. Gentle finishing and good home care keep the surface smooth so light behaves more like natural enamel. Research on CAD/CAM dental materials shows that aging can change translucency and gloss, which alters how light interacts with a restoration over time [4]. These principles guide polishing choices and follow-up.
For patients, this means a repair can look slightly different in photos, indoors, and outdoors. We plan for those shifts so the tooth blends in real life, not just under one lamp. Light-aware planning makes edges look natural across everyday settings.
Common Challenges with Edge Bonding
Edge bonding aims to fix chips and blend the repair so it disappears. The common challenges are matching brightness, recreating a clear but not gray-looking tip, and keeping the thin edge strong. Teeth also dry during treatment, which can mislead shade selection. Planning around these hurdles helps incisal translucency in bonding look natural.
Light control is the first hurdle. The biting edge is thin, so there is less dentin behind it to keep brightness high. If the outer layer is too clear, the edge can lose value and look gray, especially under cool lights. If it is too opaque, the edge looks flat. Careful layering, with a supportive body shade under a very thin translucent cap, keeps brightness while still showing depth. Because a dry tooth looks lighter, shades are chosen quickly and rechecked as the tooth rehydrates during the visit.
Strength is the second challenge. The restored edge is a thin beam that takes load in speaking and light biting. Heavy contacts, nail biting, or grinding can chip the corner or create fine cracks over time. Fracture risk is known for incisal edge repairs and reattachments, so controlling contact points and using protective habits is important [5]. Polymerization shrinkage can also pull at the margins, leaving a pale “white line” or tiny gaps. Incremental placement and a long, feathered bevel help spread stress and hide the transition.
Color stability and margins are the third challenge. Even a well-matched repair can pick up stain at the edges if the surface is rough or if the bond is stressed. Biofilm and acids at the bonded interface can weaken materials over time, increasing the chance of marginal breakdown and discoloration [6]. Smooth finishing, high polish, and regular maintenance reduce stain and help light reflect like natural enamel. For patients with night grinding, a simple guard can shield the new edge and improve longevity.
With thoughtful layering, gentle bite contacts, and good aftercare, bonded edges can look natural and last. Small details protect both appearance and strength.
Comparing Direct and Indirect Restoration Methods
Direct restorations are built on the tooth in one visit using layered composite. Indirect restorations, like porcelain veneers or lab-made composite, are made outside the mouth, then bonded to the tooth. Both can look natural at the edge when planned well. The best choice depends on how much tooth is missing, bite forces, and esthetic goals.
A cyclist nicks a front incisor on a metal bottle. With direct bonding, the dentist shapes a thin palatal shell, sets brightness with a body layer, and adds a clear enamel layer at the tip. This allows real-time control of the “halo,” opalescence, and the see-through look. Small chips and single-tooth fixes often blend beautifully because the dentist can adjust color and translucency chairside. These steps matter for incisal translucency in bonding, since a tiny change in the outer layer can shift how light passes and scatters.
Indirect restorations offer different strengths. Ceramics hold color and translucency over time, and the lab can mirror fine details for multiple front teeth. They can be more resistant to stain and wear at a thin edge. However, they usually need more room for material, so a bit more enamel may be reduced to fit the restoration. Direct bonding is often the most conservative option, and it is easy to repair if a corner chips. Indirect options are strong and stable, and can be spot-repaired or glazed if minor edge wear appears.
Bite and habits guide the decision. If the edge takes heavy load, a wider bonded footprint or an indirect veneer can spread forces and protect the tip. If the chip is small and enamel is intact, direct layering keeps the repair minimal and fully reversible. For several teeth, a lab-made plan can create even color, shape, and light behavior across the smile. A mock-up or trial restoration helps confirm brightness, edge clarity, and comfort before final treatment.
Choose the method that preserves tooth structure, fits your bite, and keeps the edge looking natural. Thoughtful planning makes either path succeed.
Patient Education on Bonding Materials
Bonding materials are tooth-colored resins used to repair chips, close small gaps, and reshape edges. They are chosen to match the look and strength of your natural teeth. Different versions control brightness, clarity, and shine so the repair blends in daily light. Your dentist selects a safe, proven material based on the tooth’s needs and your goals.
Picture a small chip on a front tooth after a fork tap. Most repairs use composite resin, which is a blend of tiny glass fillers and a clear matrix that cures hard under light. Some composites are more opaque to set overall brightness, while others are more translucent to mimic the clear enamel at the edge. This lets us manage incisal translucency in bonding so the tip looks crisp, not gray.
Bonding also needs a strong, thin glue layer called an adhesive. Universal adhesives are common, and they help the resin attach to enamel and dentin while sealing the surface. Good isolation keeps the tooth dry during this step, which improves bond strength and long-term color. A careful finish and polish make the surface smooth, which helps it resist stain and reflect light like real enamel.
Material choice affects feel and durability. More flexible, flowable resin can cushion tiny stress at the margin, but it is not ideal as the main edge. Denser, paste-like resin shapes the edge and holds polish better. A very thin, clear top layer can add depth, but it should not be too thick, or brightness can drop. Surface sealers may be added at the end to reduce tiny pores and improve gloss.
For you, this means a small chip can often be restored in one visit with a layered, color-matched material that looks natural in different lights. If several teeth or larger areas are involved, your dentist may discuss indirect options covered later. Well-chosen materials and a careful technique make small repairs look like healthy enamel.
Balancing Aesthetics and Functionality
Balancing aesthetics and functionality means the repaired edge should look natural and work well when you chew and speak. We control how clear the tip appears, how bright the tooth looks, and where the bite touches the new surface. The aim is a beautiful edge that resists chipping in daily use.
Picture a small chip from biting a fork. To keep the look natural, we set overall brightness with a supportive body layer, then add a very thin, clear enamel layer only where needed. This preserves value so the edge does not turn gray, while still showing depth. The same approach guides incisal translucency in bonding, where tiny changes in thickness can shift both color and strength.
Function is planned first, then refined for appearance. We check light contact in forward and side movements so the new edge does not take heavy hits. Corners are slightly rounded, and a long, shallow bevel spreads forces and helps the material blend. Smooth contours and a high polish reduce plaque and stains, which keeps the edge bright and the surface hard to catch with the opposite tooth. When habits like nail biting or grinding are present, we design the contact points to be lighter and discuss simple protection to lower stress on the tip.
Lighting and hydration also guide balance. Shade is chosen while the tooth is hydrated, then rechecked as we work so brightness remains steady. We limit very clear outer layers to small zones, because extra translucency can look pretty in one light but dull in another. Finally, we confirm that speech and gentle biting feel natural, then fine-tune gloss and texture so light reflects like real enamel.
For patients, this means a repair that looks right and holds up to everyday life. A beautiful edge must also be a strong edge.
Post-Procedure Care for Edge Bonding
After edge bonding, treat the repaired tooth gently while the area settles. Avoid biting hard foods with your front teeth for the first day, and chew on your back teeth instead. Sensitivity to cold or air can happen for a few days, then fade. If anything feels high or rough, call for a quick adjustment.
You chip a front tooth on a spoon. Right after treatment, the tooth may look slightly lighter because it is dry. As it rehydrates over 24 hours, the color blends with its neighbor. The composite is strong when cured, but the new edge is thin, so avoid nuts, ice, hard candy, and opening packages with your teeth. Small habits early on protect the margin and help the surface keep a glossy look.
Keep the area very clean. Brush with a soft brush and a non‑abrasive toothpaste, and floss by sliding the floss out the side instead of snapping up. Limit strong colorants for the first day, like dark sauces or tobacco, to reduce early surface stain. If you plan to whiten overall, do it before bonding, since composite does not lighten like enamel. Good daily care keeps the surface smooth so light passes naturally through the edge.
Protect the repair from heavy forces. If you clench or grind, a simple night guard can prevent tiny chips at the tip. During sports, a mouthguard shields the new edge from an impact. If the bite feels uneven, or the edge catches on your lip, return for a quick polish and balance. This keeps the clear edge looking natural, which is the goal of incisal translucency in bonding.
Know when to reach out. Call if sharpness returns, a corner chips, floss snags at the margin, or sensitivity with biting lasts more than a week. At routine checkups, minor re‑glossing can refresh shine and help resist stain. With gentle use and simple home care, bonded edges can look great for years. Small daily habits make the biggest difference.
Frequently Asked Questions
Here are quick answers to common questions people have about Lifelike Edge Bonding With Translucency in Glendale, AZ.
- What factors influence incisal translucency in bonding?
Several factors influence incisal translucency in bonding. These include the thickness of the enamel, the remaining dentin support, and the translucency of the composite material used. The process of layering composites with varying opacity helps achieve a lifelike appearance. Dentists consider the edge length, planned function, shade value, and existing features like a halo or mamelons to match natural teeth. Adjusting these elements ensures the bonded edge looks natural and seamlessly blends with the tooth.
- How does light affect incisal translucency in bonding?
Light has a significant impact on how bonded edges look. In different lighting conditions, such as indoor LEDs or natural sunlight, the translucency at the tooth’s edge can appear differently. Cool light may make it look bluish, while warm light might enhance brightness. Adjustments in layering and material selection during bonding are essential to ensure the tooth appears natural under various lighting conditions. This helps maintain consistent appearance across different settings.
- What role does enamel play in incisal translucency?
Enamel plays a crucial role in incisal translucency by allowing light to enter, scatter, and exit, creating a clear appearance at the tooth’s edge. The thin enamel at the tip, with little dentin backing, allows for translucency but can also create challenges if it appears too gray or dull. Proper composite layering can mimic this natural translucency while enhancing the overall brightness and aesthetic appeal, ensuring the tooth looks natural.
- Why is layering important in composite bonding?
Layering is essential in composite bonding because natural teeth have varying opacity and color. By layering composites, dentists can replicate this natural appearance by controlling lightness, depth, and translucency. A base layer sets brightness, while a translucent enamel layer can add depth and clarity. This technique helps blend repairs seamlessly with the natural tooth, ensuring it looks authentic and vibrant in different lights.
- How can composite bonding match the translucency of natural teeth?
Composite bonding matches the translucency of natural teeth through careful selection and layering of materials. Dentists use a thin, translucent enamel layer that mimics the gloss and opalescence of natural teeth. Additional opaque layers can adjust brightness and color, allowing light to pass through and scatter naturally. By customizing each layer, dentists can make the bonded edge indistinguishable from the natural tooth in both color and translucency.
References
- [1] Incisal translucency of vital natural unrestored teeth: a clinical study. (2012) — PubMed:23025317 / DOI: 10.1111/j.1708-8240.2012.00511.x
- [2] Translucency characteristics of permanent maxillary central incisor in Indian population: An analytical cross-sectional study. (2023) — PubMed:38292740 / DOI: 10.4103/JCDE.JCDE_44_23
- [3] Impact of Shades and Thickness on the Polymerization of Low-Viscosity Bulk-Fill Composites in Pediatric Restorations: An In Vitro Study. (2025) — PubMed:40863055 / DOI: 10.3390/dj13080352
- [4] Resistance of CAD/CAM material surfaces to aging: a comparison of translucency, gloss, and roughness. (2025) — PubMed:41216574 / DOI: 10.26650/eor.20251488741
- [5] Incisal edge reattachment: literature review and treatment perspectives. (1998) — PubMed:9780892
- [6] Designing Multiagent Dental Materials for Enhanced Resistance to Biofilm Damage at the Bonded Interface. (2016) — PubMed:27081913 / DOI: 10.1021/acsami.6b01923